

Quick Start
Add Provider in Model Catalog
To integrate Azure AI Foundry with Portkey, you’ll create a provider in the Model Catalog. This securely stores your Azure AI Foundry credentials, allowing you to use a simple identifier in your code instead of handling sensitive authentication details directly.OpenAI models on Azure
If you’re specifically looking to use OpenAI models on Azure, you should use
Azure OpenAI instead, which is optimized
for OpenAI models.
Understanding Azure AI Foundry Deployments
Azure AI Foundry offers three different ways to deploy models, each with unique endpoints and configurations:- AI Services: Azure-managed models accessed through Azure AI Services endpoints
- Managed: User-managed deployments running on dedicated Azure compute resources
- Serverless: Seamless, scalable deployment without managing infrastructure
Creating Your Azure AI Foundry Provider
Integrate Azure AI Foundry with Portkey to centrally manage your AI models and deployments. This guide walks you through setting up the provider using API key authentication.Prerequisites
Before creating your provider, you’ll need:- An active Azure AI Foundry account
- Access to your Azure AI Foundry portal
- A deployed model on Azure Foundry
Step 1: Navigate to Model Catalog
Go to Model Catalog → Add Provider and select Azure AI Foundry as your provider.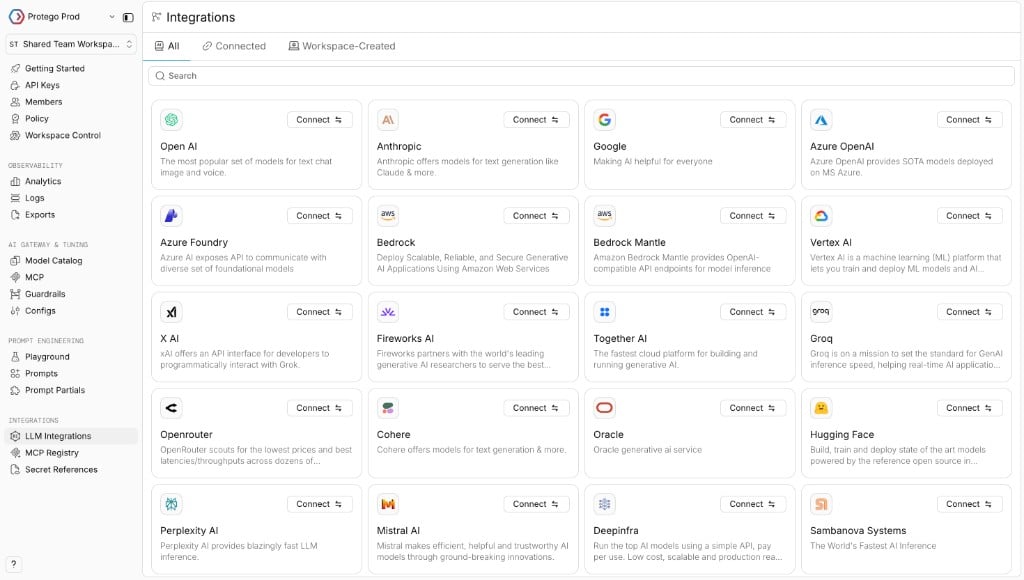
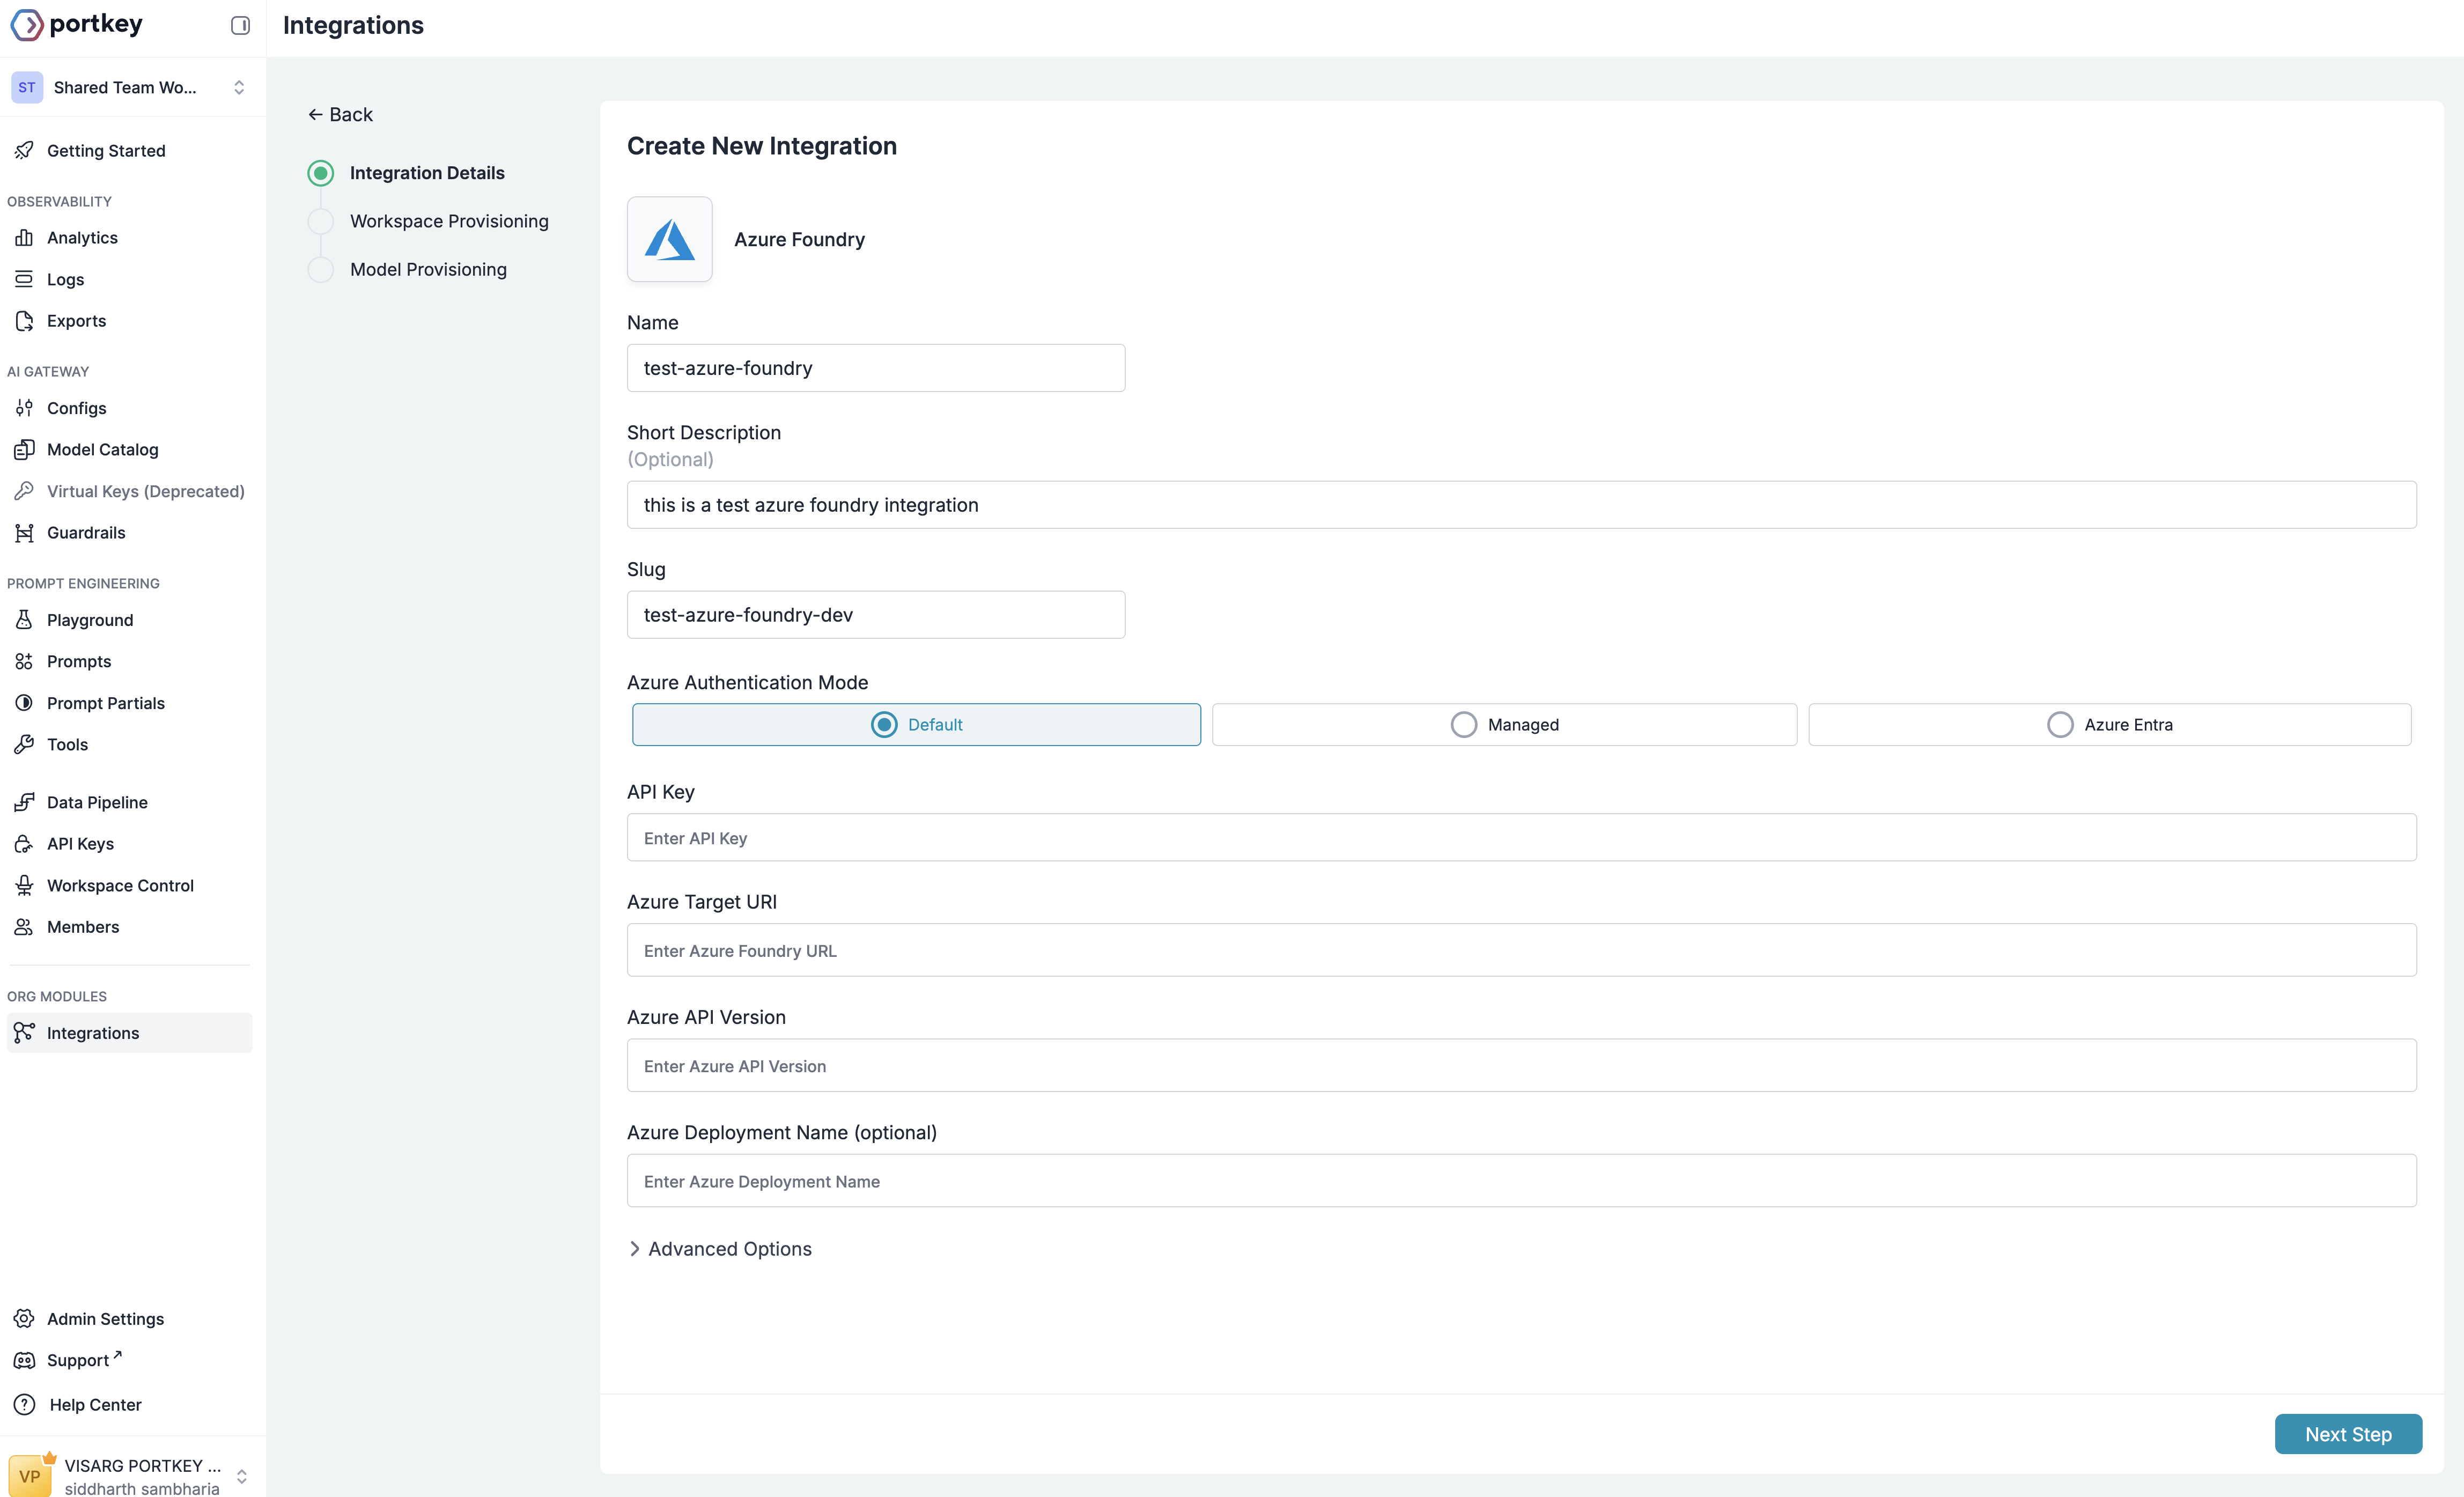
Step 2: Configure Provider Details
Fill in the basic information for your provider:- Name: A descriptive name for this provider (e.g., “Azure AI Production”)
- Short Description: Optional context about this provider’s purpose
-
Slug: A unique identifier used in API calls (e.g., “@azure-ai-prod”)
Step 3: Set Up Authentication
Portkey supports three authentication methods for Azure AI Foundry. For most use cases, we recommend using the Default (API Key) method.- Default (API Key)
- Azure Managed Entity
- Azure Entra ID
Gather Your Azure Credentials
From your Azure AI Foundry portal, you’ll need to collect: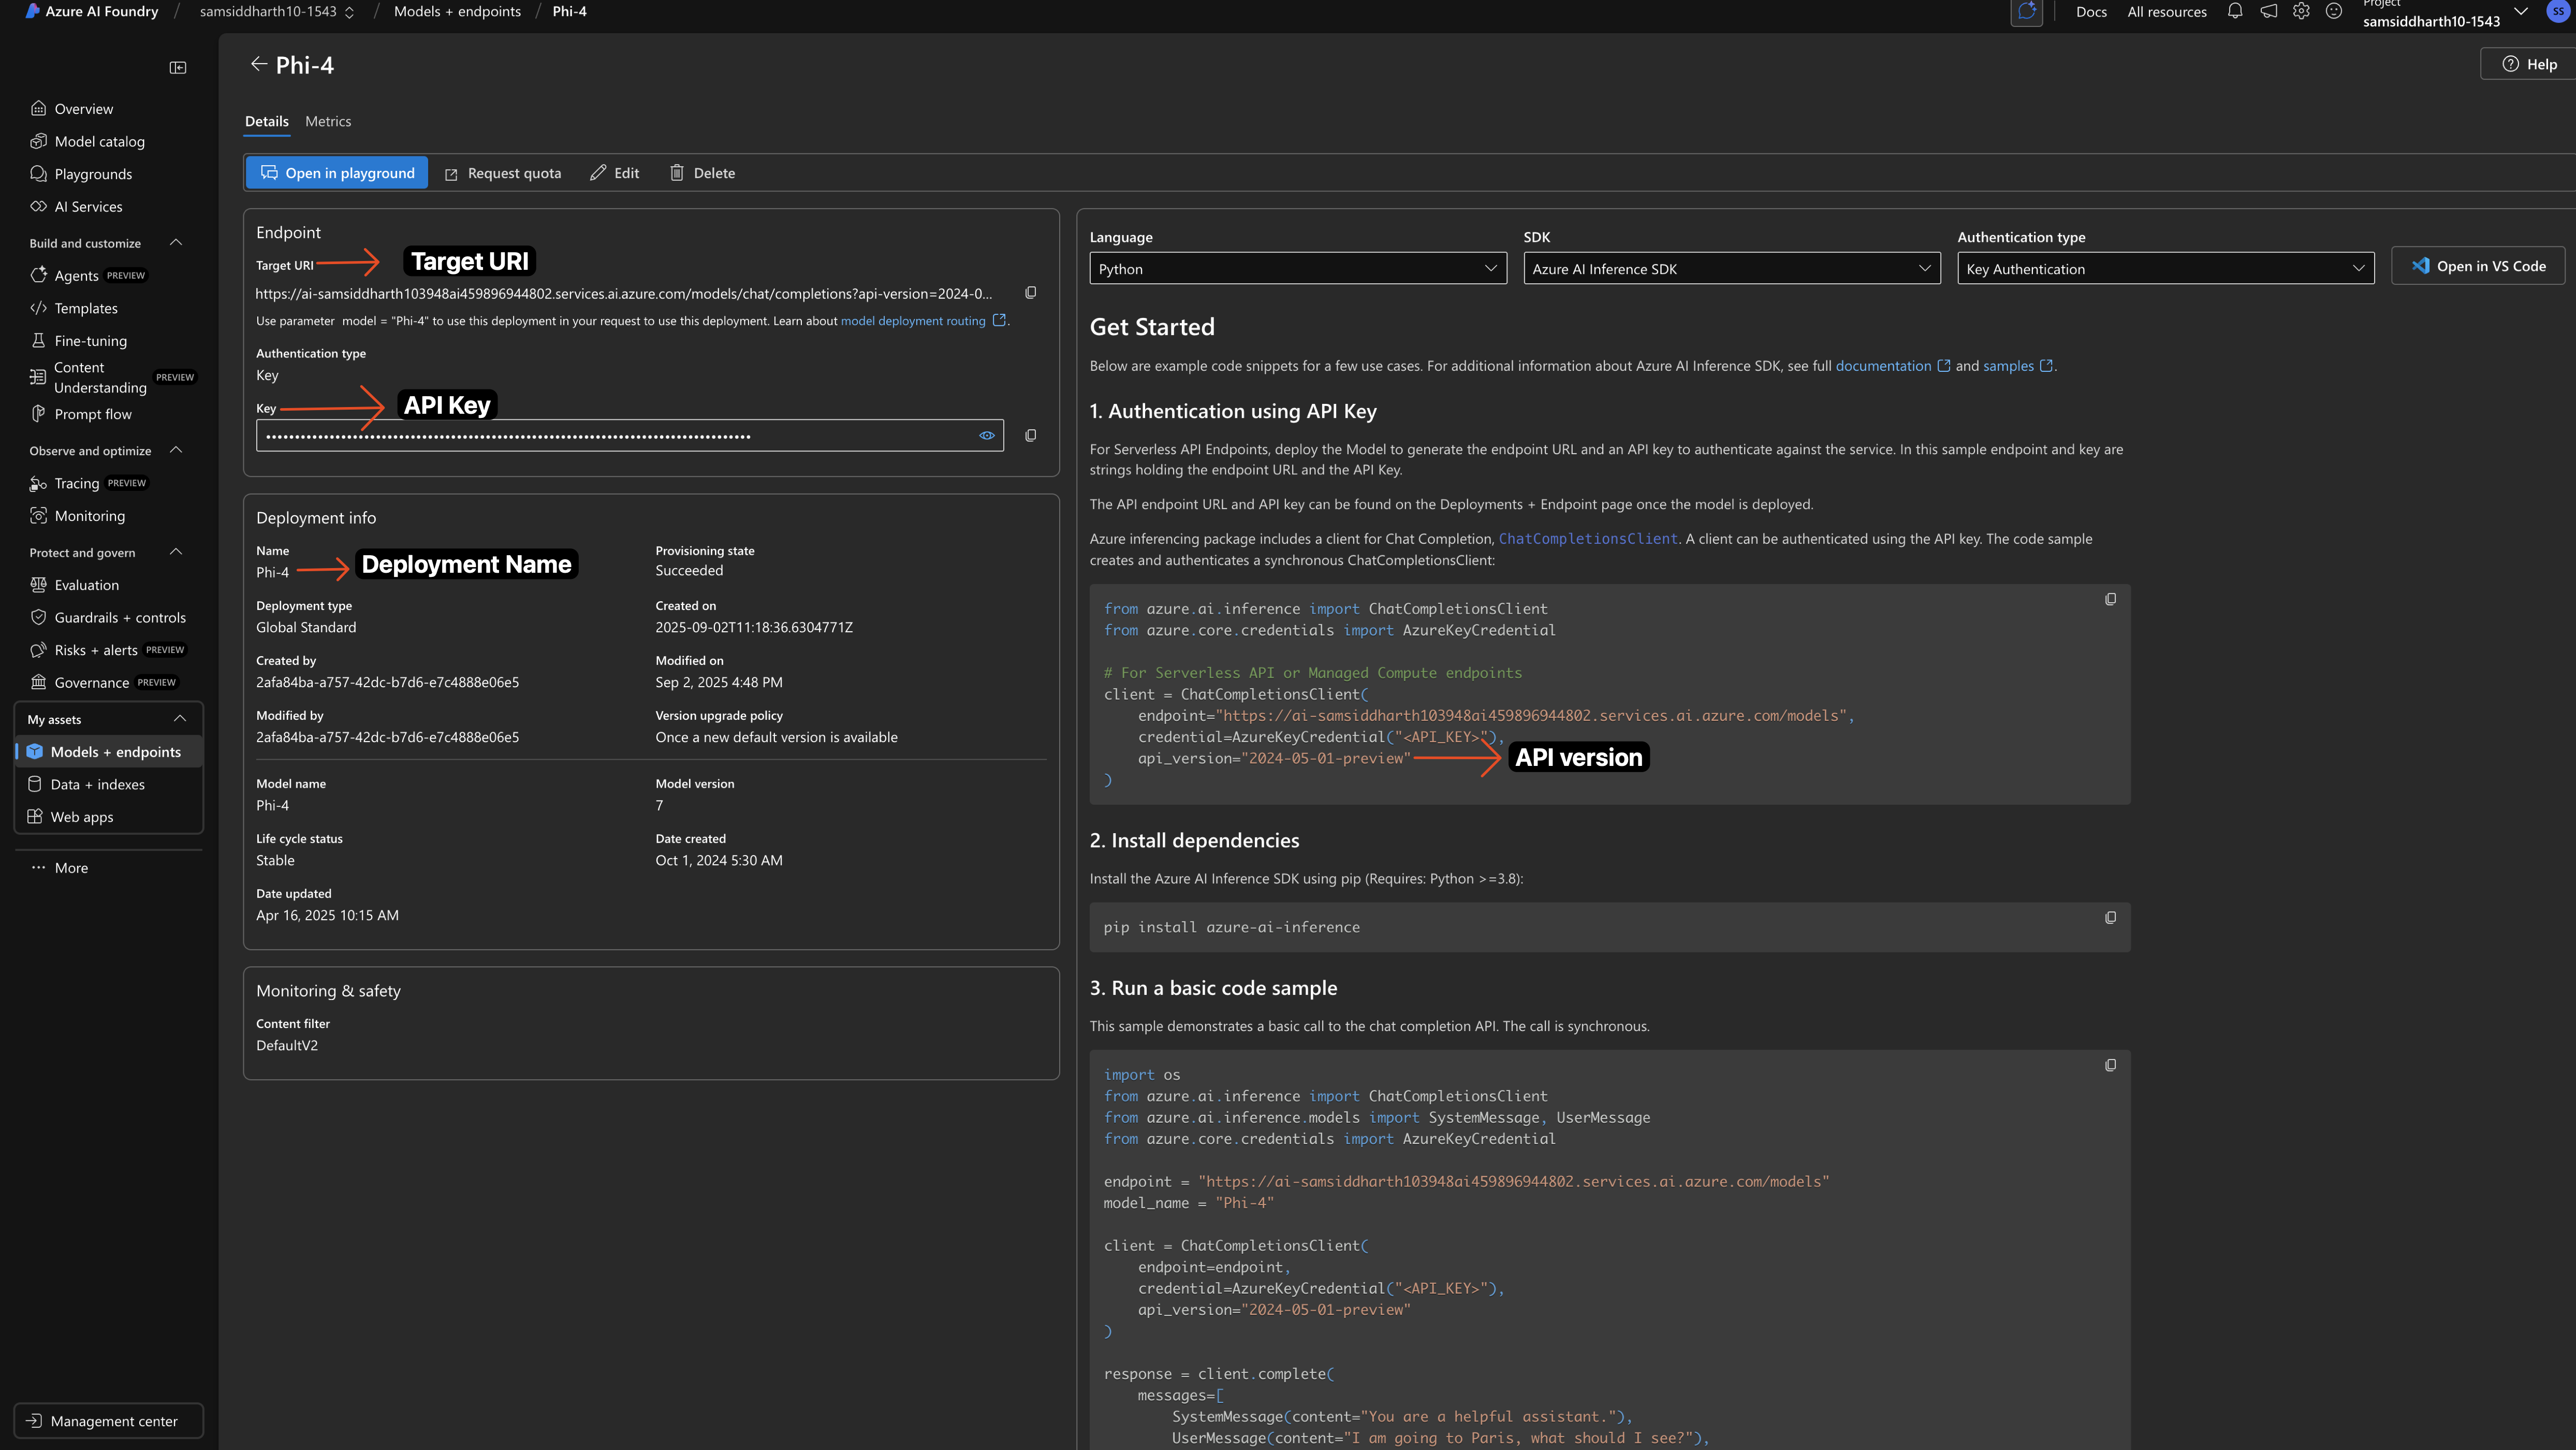
- Navigate to your model deployment in Azure AI Foundry
- Click on the deployment to view details
- Copy the API Key from the authentication section
- Copy the Target URI - this is your endpoint URL
- Note the API Version from your deployment URL
- Azure Deployment Name (Optional): Only required for Managed Services deployments
Enter Credentials in Portkey
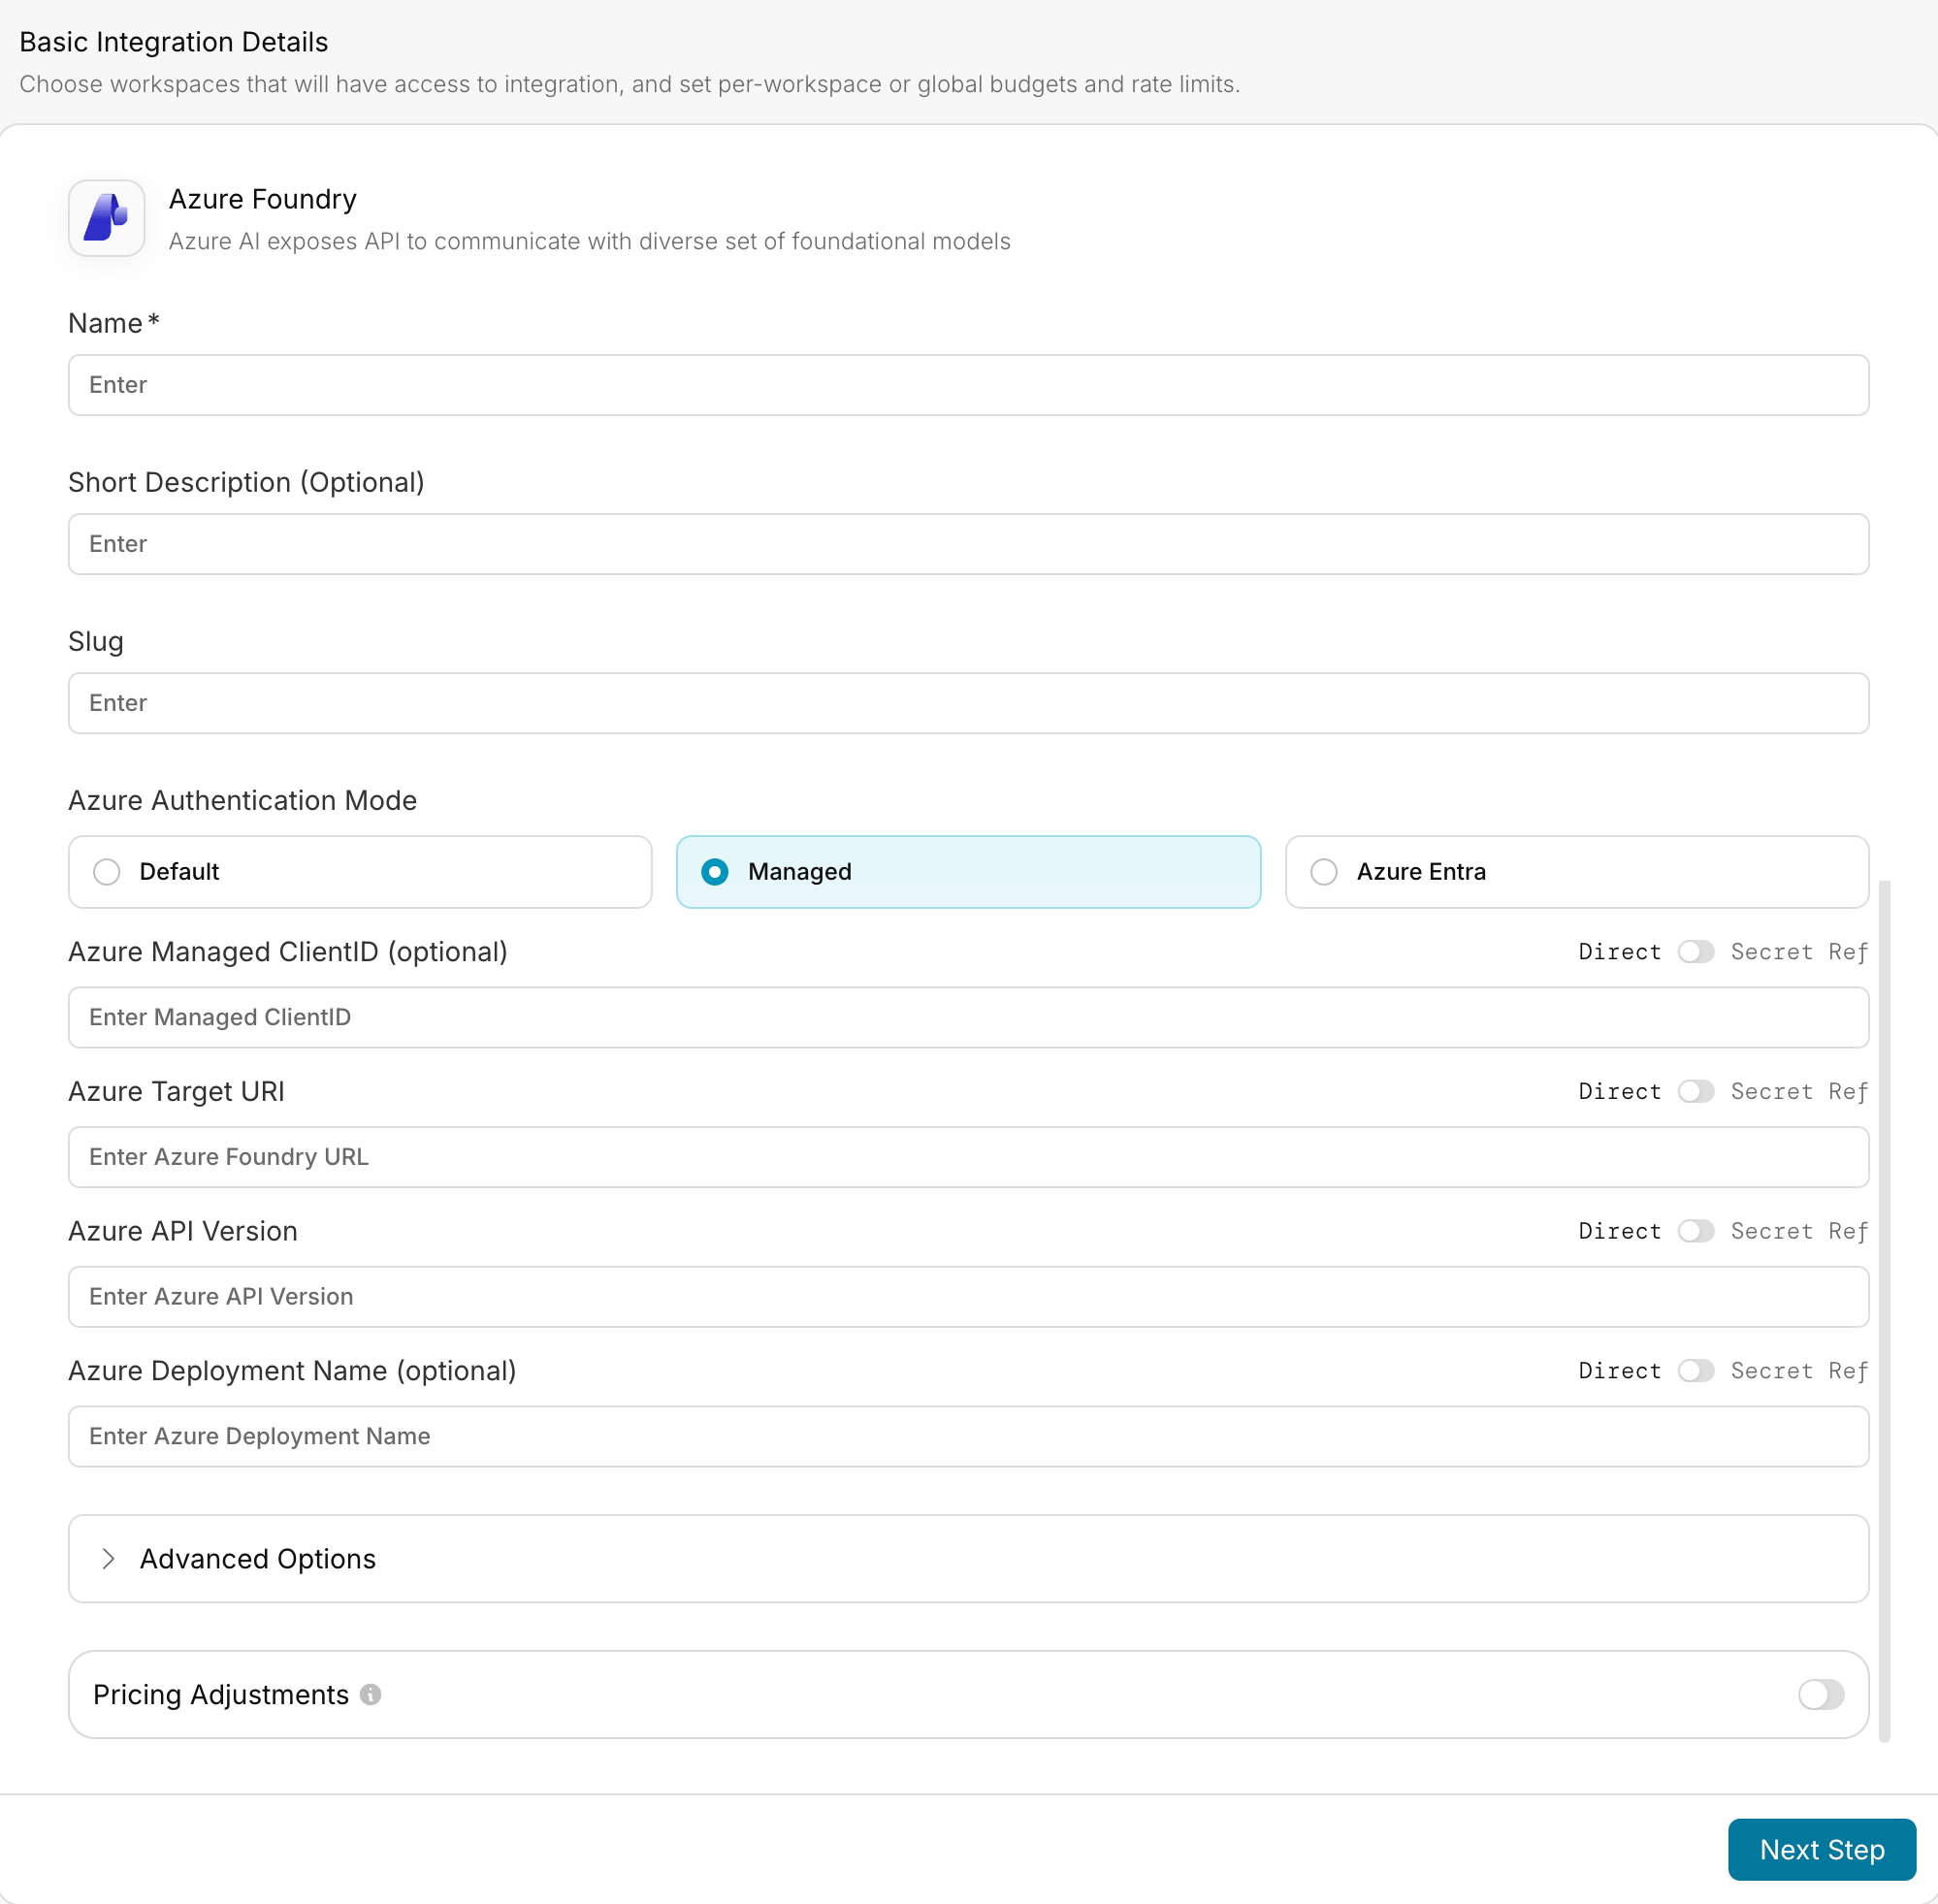
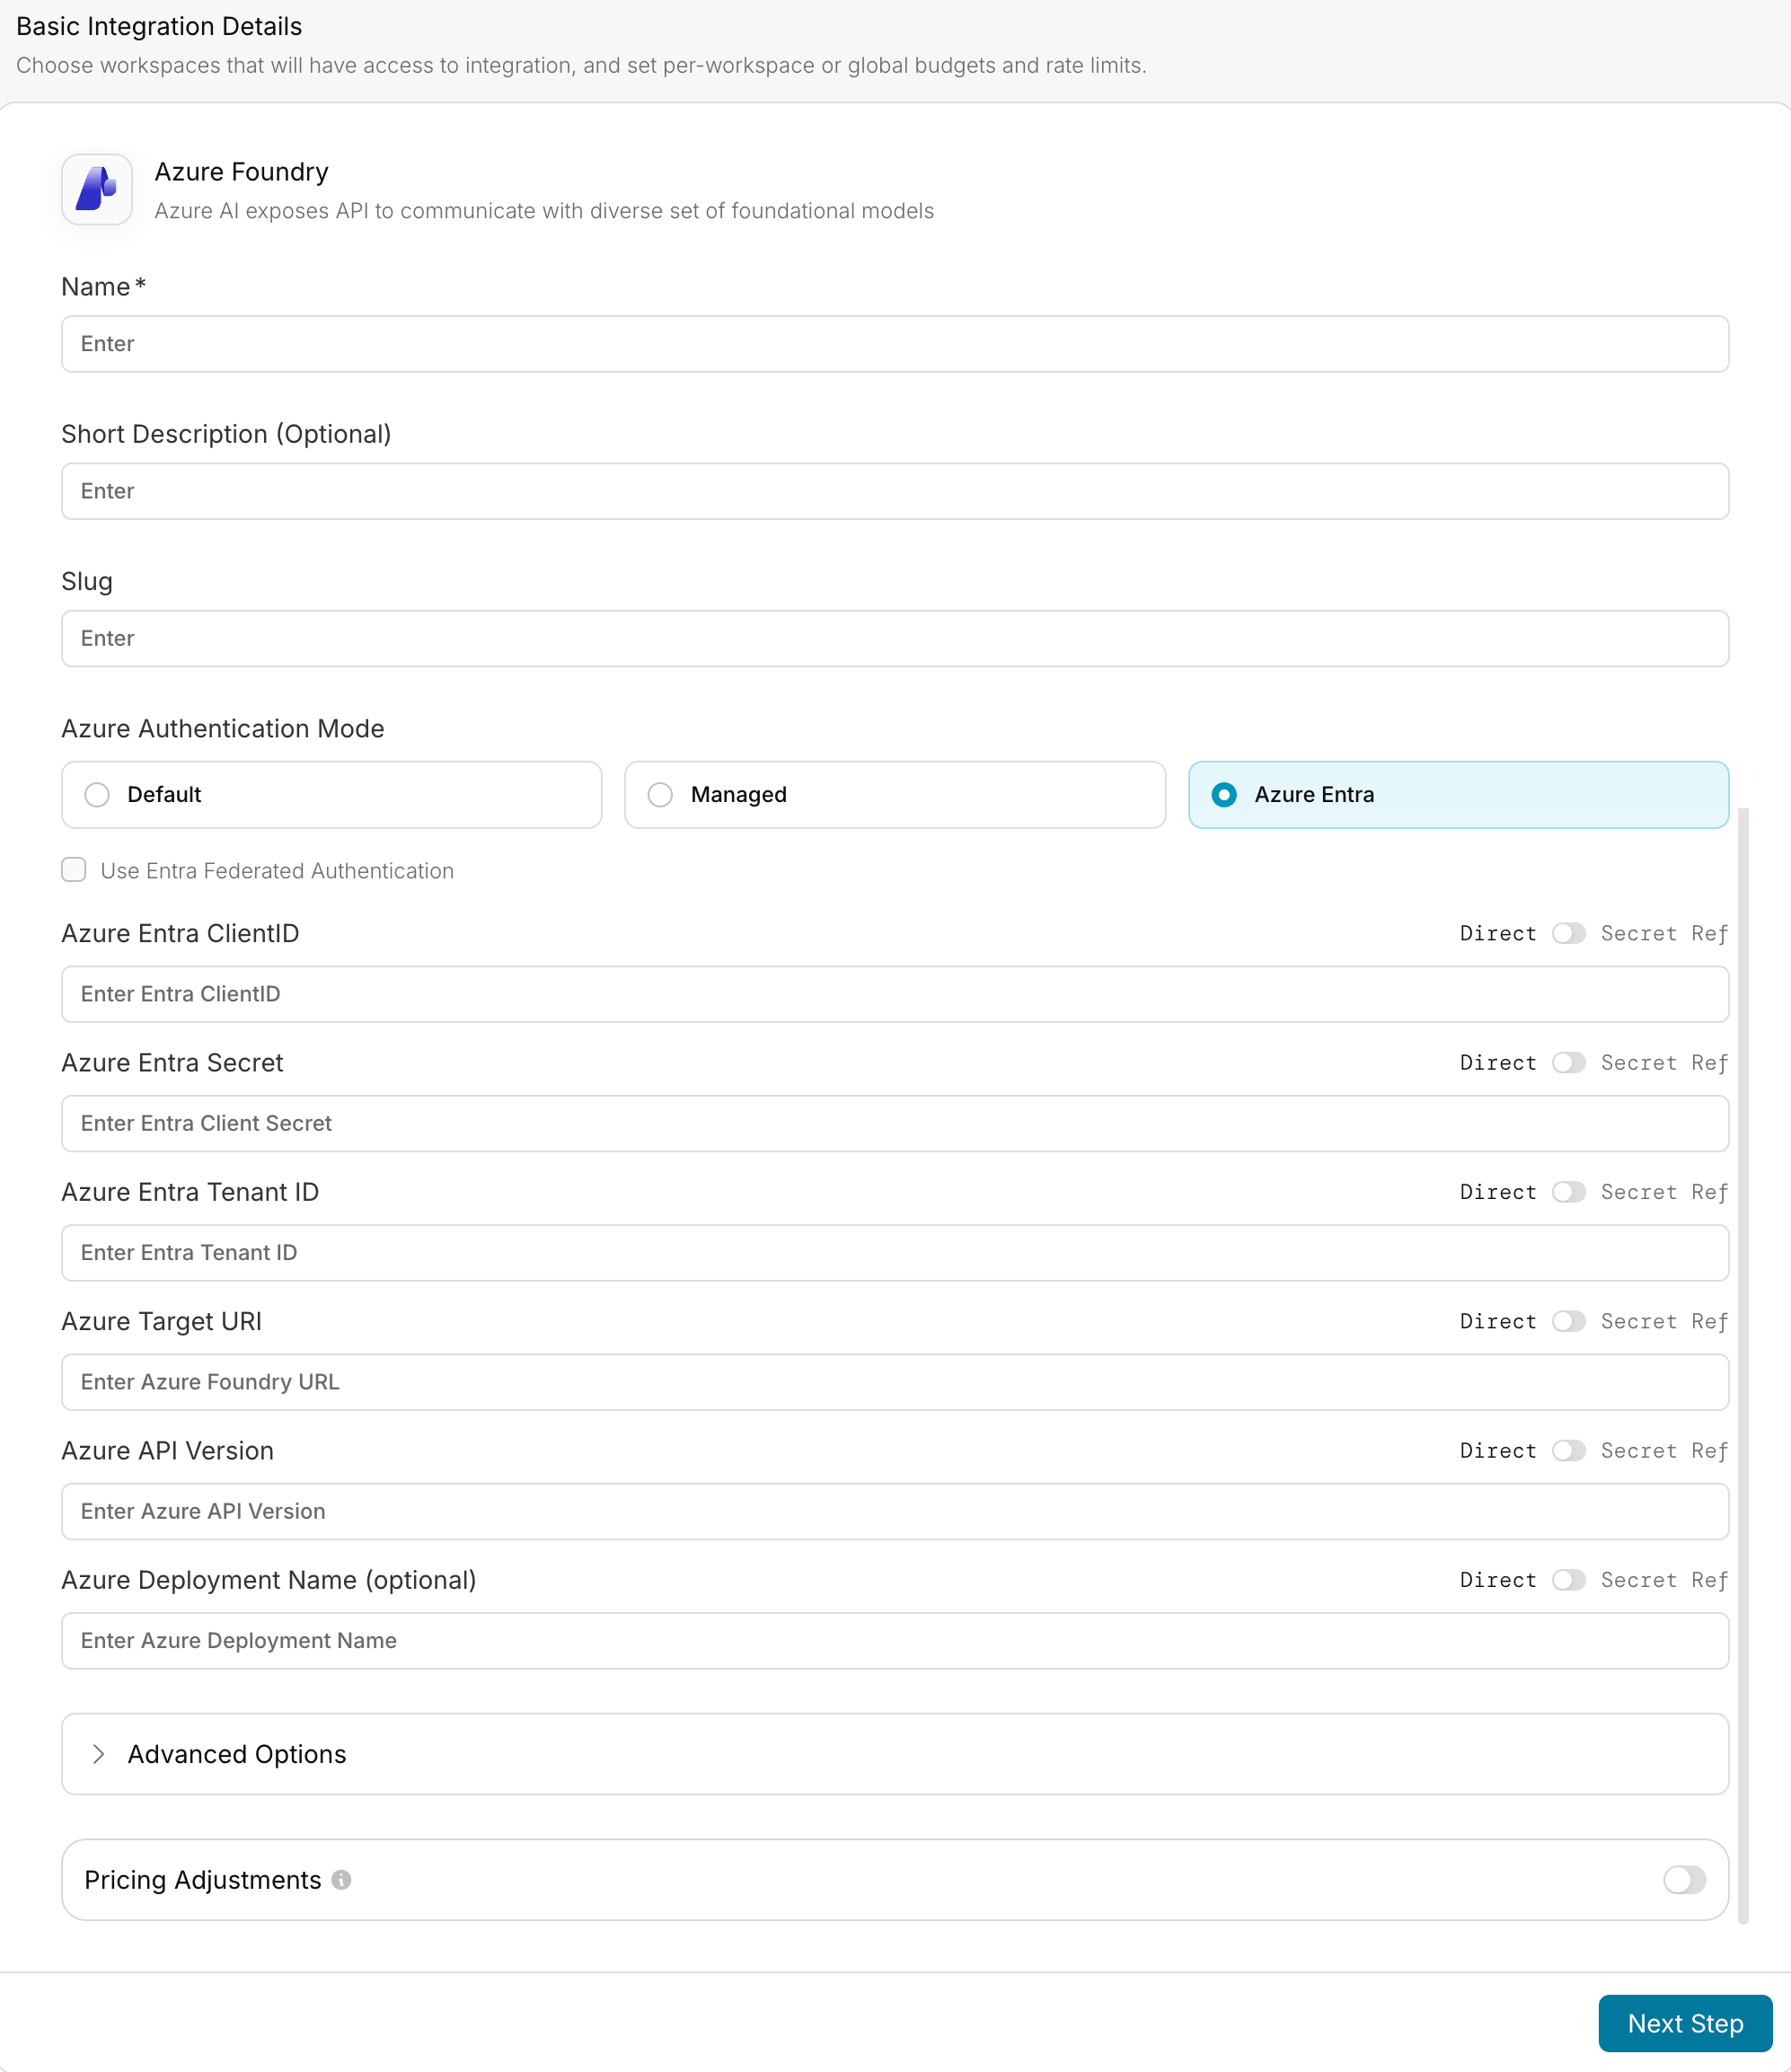
/api/projects/<project-name>/openai/v1, such as https://your-resource-name.services.ai.azure.com/api/projects/your-project-name/openai/v1, exactly as shown in Azure AI Foundry. Portkey appends the request route, such as /chat/completions, when sending traffic to the deployment.
Adding Multiple Models to Your Azure AI Foundry Provider
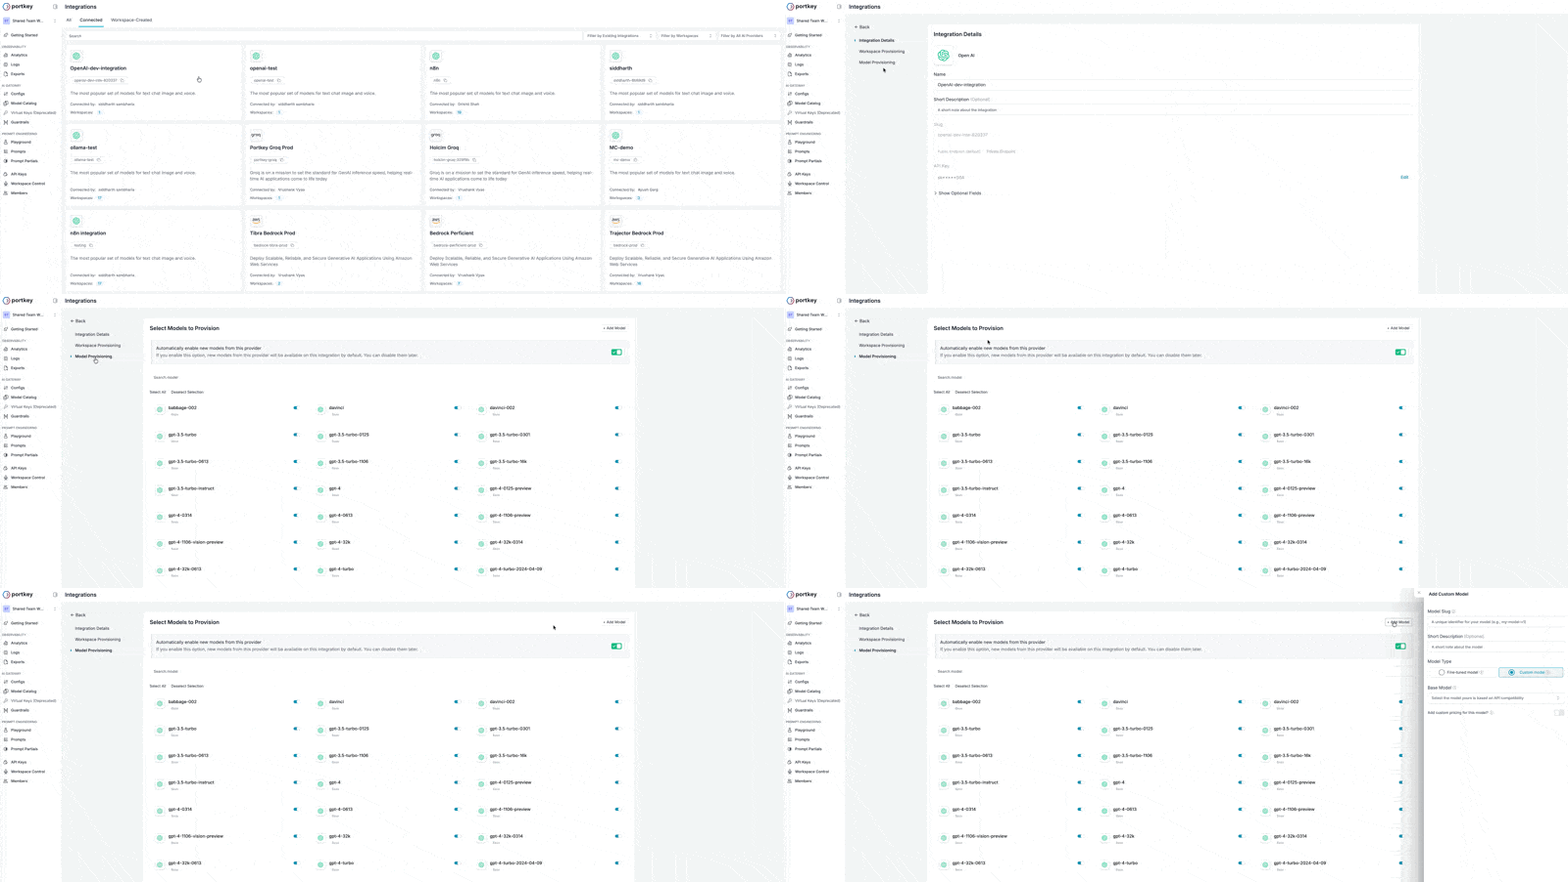
You can deploy multiple models through a single Azure AI Foundry provider by using Portkey’s custom models feature.Steps to Add Additional Models
- Navigate to your Azure AI Foundry provider in Model Catalog
- Select the Model Provisioning step
- Click Add Model in the top-right corner
Configure Your Model
Enter the following details for your Azure deployment: Model Slug: Use your Azure Model Deployment name exactly as it appears in Azure AI Foundrygpt-4 for GPT-4 deployments)
This is just for reference. If you can’t find the particular model, you can
just choose a similar model.
Using Anthropic Models on Azure AI Foundry
Azure AI Foundry supports Anthropic models (Claude) through a slightly different configuration process. Follow these steps to integrate Anthropic models with Portkey.Step 1: Create an Azure Foundry Provider
When creating the provider for Anthropic models, you’ll need to configure the following:- Azure API Key: Copy this from your Azure Foundry console
-
Azure Target URI: From your Foundry console, you’ll get a URL like:
You need to strip your URL till
/anthropic:
For Anthropic models on Azure Foundry, you don’t need to provide the Azure
API Version or Deployment Name fields.
Step 2: Configure Workspace Provisioning
After setting up the provider credentials, proceed with the workspace provisioning step as usual.Step 3: Add Your Anthropic Model
In the Model Provisioning step:- Click the + Add Model button at the top
- Configure the model with these details:
- Model Slug: Enter your deployment name from the Azure Foundry console
- Base Model: Search for and select your Anthropic model (e.g.,
claude-opus-4-5-20251101,claude-sonnet-4-5-20250929,claude-haiku-4-5-20251001,claude-opus-4-1-20250805)
- Save the configuration
Making Requests to Anthropic Models
Once configured, you can call your Anthropic model using the Model Slug you saved:- NodeJS
- Python
- cURL
Using the /messages Route with Azure Foundry Anthropic Models
Access Anthropic models on Azure AI Foundry through Anthropic’s native/messages endpoint using Portkey’s SDK or Anthropic’s SDK.
The
/messages route provides access to Anthropic-native features like
extended thinking, prompt caching, and native streaming formats when using
Claude models on Azure AI Foundry.- cURL
- Anthropic Python SDK
- Anthropic TS SDK
Using the Responses API with Azure AI Foundry
Portkey supports the Responses API on Azure AI Foundry in two modes. Pick the one that matches your Azure deployment.
In both modes, Portkey logging, tracing, guardrails, caching, retries, and fallbacks continue to work.
Mode 1 - Gateway Transformation (Default)
This is the default behaviour and requires no extra configuration. Portkey accepts the request at/v1/responses, adapts the payload to Chat Completions, calls Azure AI Foundry’s /chat/completions endpoint, and translates the response back to the Responses API format before returning it to you.
Because the call is made over Chat Completions on Azure’s side, every model on your Azure AI Foundry provider works — even ones that don’t natively expose a Responses endpoint.
Features that rely on Azure storing response state —
previous_response_id, store, retrieve/delete on /v1/responses/:id, and built-in tools like web_search — are not available in this mode. Use multi-turn input arrays to carry conversation history. See Open Responses → Native-Only Features.Mode 2 - Direct Responses (Proxy)
When your Azure AI Foundry deployment exposes a native/responses endpoint (for example, Azure AI Agents), set the x-portkey-provider-responses-proxy header to true. Portkey will skip the Chat Completions transformation and forward the request body exactly as-is to Azure’s native Responses endpoint.
This is required to use Azure-specific parameters such as agent_reference, which targets a deployed Azure AI Agent.
Direct mode forwards the payload verbatim. Your Azure deployment must accept the Responses API schema — if it doesn’t, requests will fail. Use Gateway Transformation (Mode 1) for everything else.
Choosing the right mode
- Use Gateway Transformation for general-purpose Responses API calls against any Azure-deployed model.
- Use Direct (Proxy) when calling Azure AI Agents or any Azure deployment that exposes the native Responses endpoint and you need Azure-specific parameters (
agent_reference, server-side response storage, etc.).
Sample Request
Once you’ve created your provider, you can start making requests to Azure AI Foundry models through Portkey.- NodeJS
- Python
- cURL
Install the Portkey SDK with npm
Advanced Features
Function Calling
Azure AI Foundry supports function calling (tool calling) for compatible models. Here’s how to implement it with Portkey:Vision Capabilities
Process images alongside text using Azure AI Foundry’s vision capabilities:Structured Outputs
Get consistent, parseable responses in specific formats:Portkey Gateway Features
Portkey provides advanced gateway features for Azure AI Foundry deployments:Fallbacks
Create fallback configurations to ensure reliability when working with Azure AI Foundry models:Load Balancing
Distribute requests across multiple models for optimal performance:Conditional Routing
Route requests based on specific conditions like user type or content requirements:Managing Prompts
You can manage all prompts to Azure AI Foundry in the Prompt Library. Once you’ve created and tested a prompt in the library, use theportkey.prompts.completions.create interface to use the prompt in your application.
Rerank
Azure AI Foundry supports reranking through Cohere models deployed on the platform. Use the Portkey unified/rerank endpoint with the cohere. model prefix:
cohere. prefix in the model name is automatically stripped before forwarding to the provider.
Next Steps
SDK Reference
Complete SDK documentation and API reference
Azure OpenAI
Use Azure OpenAI for OpenAI-specific models
Add Metadata
Add custom metadata to your Azure AI Foundry requests
Gateway Configs
Configure advanced gateway features
Request Tracing
Trace your Azure AI Foundry requests
Setup Fallbacks
Create fallback configurations between providers